How to Enable Scan Visualization in AR
Niantic Spatial SDK's raycast visualization feature provides real-time visual feedback during scanning by overlaying diagonal stripes on the camera feed. Areas that have been successfully scanned appear in full color, while unscanned areas display the stripe pattern. This helps you ensure comprehensive coverage of the scene while recording.
This how-to will walk you through:
- Setting up AR Scanning Manager with raycast visualization
- Creating a material for rendering the visualization
- Building a script to handle scanning and visualization rendering
Prerequisites
You will need a Built-in Render Pipeline Unity project with ARDK installed and a basic AR scene. For more information, see Installing ARDK 3 and Setting up a Basic AR Scene.
This sample code only works with Unity's Built-in Render Pipeline. OnRenderImage is not compatible with URP, so a different approach to rendering the scanning stripes will be required for URP projects.
Configure AR Scanning Manager
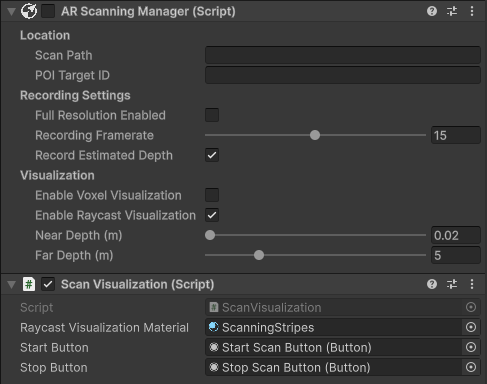
First, add an AR Scanning Manager component with the correct settings for raycast visualization.
- In your scene hierarchy, select the XR Origin → Camera Offset → Main Camera GameObject.
- In the Inspector window, click Add Component and add an AR Scanning Manager component to Main Camera.
- Configure the following settings:
- Enable Record Estimated Depth (or leave unchecked if your device has lidar and add an AR Occlusion Manager to Main Camera).
- Enable Enable Raycast Visualization.
- Disable the manager component so that it does not start recording when the scene starts.
If your device has a lidar sensor, you can leave Record Estimated Depth unchecked. Ensure that Prefer LiDAR if Available is enabled in Niantic SDK Settings under XR Plug-in Management. You will also need an AR Occlusion Manager component on the Main Camera to enable lidar depth data.
Create the Visualization Material
The raycast visualization requires a material that uses the LightshipScanningStripes shader.
- In your project's Assets folder, right-click and select Create → Material. Name it ScanningStripesMaterial.
- With the material selected in the Inspector, click the shader dropdown and search for LightshipScanningStripes.
- Optionally, adjust the Stripe Color property to change the color of the scanning stripes (default is red).
Set Up the UI
Add buttons to control scanning from the user interface.
- Find your Canvas GameObject in the hierarchy, or create one if it does not exist (Right-click → UI → Canvas).
- Under the Canvas, add two Legacy Buttons (Right-click → UI → Legacy → Button). Name them Start Button and Stop Button.
- Update each button's text label to match its name:
- Select the Start Button GameObject, expand it in the hierarchy, and select the Text child object. In the Inspector, change the Text field to "Start".
- Repeat for Stop Button, setting the text to "Stop".
- In the Inspector, disable the Stop Button so it's hidden until scanning starts.
- Position the buttons in the scene view so they are visible and accessible.
Create the Visualization Script
Now, create a script that handles scanning and renders the raycast visualization.
- Ensure that your project uses the Built-in Render Pipeline. If this project uses URP, see the note under Prerequisites.
- Enable unsafe C# code to facilitate interaction with the SDK's native layer. Under Edit → Project Settings → Player → Other Settings, enable Allow 'unsafe' Code.
- In the Hierarchy, select the Main Camera GameObject.
- In the Inspector, click Add Component and select New Script. Name the script ScanVisualization.
- Double-click the script to open it in your code editor.
- Add the necessary using statements and serialized fields:
using System.Collections.Generic;
using Niantic.Lightship.AR.Scanning;
using Niantic.Lightship.AR.Utilities;
using UnityEngine;
using UnityEngine.UI;
using UnityEngine.XR.ARFoundation;
using UnityEngine.XR.ARSubsystems;
using Unity.Collections.LowLevel.Unsafe;

public class ScanVisualization : MonoBehaviour
{
    [SerializeField]
    private Material _raycastVisualizationMaterial;

    [SerializeField]
    private Button _startButton;

    [SerializeField]
    private Button _stopButton;

    private ARCameraManager _arCameraManager;
    private ARScanningManager _arScanningManager;
    private Queue<Texture2D> _cameraTexturesQueue;
    private const int Delay = 2; // Delay frames to synchronize visualization with camera image
    private bool _isScanning;
- Initialize the camera manager and button listeners in
Start():
    private void Start()
    {
        _arCameraManager = GetComponent<ARCameraManager>();
        _arScanningManager = GetComponent<ARScanningManager>();
        if (_arCameraManager == null || _arScanningManager == null
            || _raycastVisualizationMaterial == null
            || _startButton == null || _stopButton == null)
        {
            Debug.LogError("A required component is not present. " +
                           "Please check the serialized fields in the Inspector " +
                           "and place this script on a GameObject with the " +
                           "ARCameraManager and ARScanningManager.");
            return;
        }

        _cameraTexturesQueue = new Queue<Texture2D>();
        _arCameraManager.frameReceived += OnARCameraFrameReceived;

        _startButton.onClick.AddListener(StartScanning);
        _stopButton.onClick.AddListener(StopScanning);
    }
- Add the
StartScanning()method:
    public void StartScanning()
    {
        _isScanning = true;
        _startButton.gameObject.SetActive(false);
        _stopButton.gameObject.SetActive(true);
        _arScanningManager.enabled = true;
    }
- Add the
StopScanning()method:
    public void StopScanning()
    {
        _isScanning = false;
        _startButton.gameObject.SetActive(true);
        _stopButton.gameObject.SetActive(false);
        _arScanningManager.enabled = false;

        // Clear the camera texture queue
        while (_cameraTexturesQueue.Count > 0)
        {
            Destroy(_cameraTexturesQueue.Dequeue());
        }
    }
- Implement the camera frame handler to capture camera textures:
    private void OnARCameraFrameReceived(ARCameraFrameEventArgs args)
    {
        if (!(_isScanning && _arScanningManager.EnableRaycastVisualization))
        {
            return;
        }

#if UNITY_EDITOR
        if (args.textures.Count == 0)
        {
            Debug.LogWarning("Camera frame received with no textures.");
            return;
        }
        var sourceTexture = args.textures[0];
        Texture2D newTexture = new Texture2D(sourceTexture.width, sourceTexture.height, sourceTexture.format, sourceTexture.mipmapCount > 1);
        Graphics.CopyTexture(sourceTexture, 0, 0, newTexture, 0, 0);
#else
        if (!_arCameraManager.TryAcquireLatestCpuImage(out XRCpuImage image))
        {
            return;
        }

        TextureFormat format = TextureFormat.RGBA32;
        var newTexture = new Texture2D(image.width, image.height, format, false);
        var conversionParams = new XRCpuImage.ConversionParams(image, format, XRCpuImage.Transformation.None);

        var rawTextureData = newTexture.GetRawTextureData<byte>();
        try
        {
            unsafe
            {
                image.Convert(conversionParams, new System.IntPtr(rawTextureData.GetUnsafePtr()), rawTextureData.Length);
                newTexture.Apply();
            }
        }
        finally
        {
            image.Dispose();
        }
#endif
        // Prevent the queue from growing indefinitely
        while (_cameraTexturesQueue.Count > Delay + 1)
        {
            DestroyImmediate(_cameraTexturesQueue.Dequeue());
        }

        _cameraTexturesQueue.Enqueue(newTexture);
    }
- Implement
OnRenderImage()to render the visualization overlay:
    private void OnRenderImage(RenderTexture src, RenderTexture dest)
    {
        if (_isScanning && _arScanningManager.EnableRaycastVisualization)
        {
            if (_cameraTexturesQueue.Count <= Delay)
            {
                Graphics.Blit(src, dest);
                return;
            }

            var currentTexture = _cameraTexturesQueue.Dequeue();

            // Set the material properties for the shader
            _raycastVisualizationMaterial.SetTexture("MainTex", currentTexture);
            _raycastVisualizationMaterial.SetTexture("_ColorTex", _arScanningManager.GetRaycastColorTexture());
            _raycastVisualizationMaterial.SetInt("_ScreenOrientation", (int)XRDisplayContext.GetScreenOrientation());
            _raycastVisualizationMaterial.SetTexture("_ArCameraTex", currentTexture);

            // Render with the visualization material
            Graphics.Blit(src, dest, _raycastVisualizationMaterial);

            Destroy(currentTexture);
        }
        else
        {
            Graphics.Blit(src, dest);
        }
    }
- Clean up in
OnDestroy()and complete the class:
    private void OnDestroy()
    {
        if (_arCameraManager != null)
        {
            _arCameraManager.frameReceived -= OnARCameraFrameReceived;
        }

        while (_cameraTexturesQueue != null && _cameraTexturesQueue.Count > 0)
        {
            Destroy(_cameraTexturesQueue.Dequeue());
        }
    }
}
Click to reveal the full script
using System.Collections.Generic;
using Niantic.Lightship.AR.Scanning;
using Niantic.Lightship.AR.Utilities;
using UnityEngine;
using UnityEngine.UI;
using UnityEngine.XR.ARFoundation;
using UnityEngine.XR.ARSubsystems;
using Unity.Collections.LowLevel.Unsafe;

public class ScanVisualization : MonoBehaviour
{
    [SerializeField]
    private Material _raycastVisualizationMaterial;

    [SerializeField]
    private Button _startButton;

    [SerializeField]
    private Button _stopButton;

    private ARCameraManager _arCameraManager;
    private ARScanningManager _arScanningManager;
    private Queue<Texture2D> _cameraTexturesQueue;
    private const int Delay = 2; // Delay frames to synchronize visualization with camera image
    private bool _isScanning;

    private void Start()
    {
        _arCameraManager = GetComponent<ARCameraManager>();
        _arScanningManager = GetComponent<ARScanningManager>();
        if (_arCameraManager == null || _arScanningManager == null
            || _raycastVisualizationMaterial == null
            || _startButton == null || _stopButton == null)
        {
            Debug.LogError("A required component is not present. " +
                           "Please check the serialized fields in the Inspector " +
                           "and place this script on a GameObject with the " +
                           "ARCameraManager and ARScanningManager.");
            return;
        }

        _cameraTexturesQueue = new Queue<Texture2D>();
        _arCameraManager.frameReceived += OnARCameraFrameReceived;

        _startButton.onClick.AddListener(StartScanning);
        _stopButton.onClick.AddListener(StopScanning);
    }

    public void StartScanning()
    {
        _isScanning = true;
        _startButton.gameObject.SetActive(false);
        _stopButton.gameObject.SetActive(true);
        _arScanningManager.enabled = true;
    }

    public void StopScanning()
    {
        _isScanning = false;
        _startButton.gameObject.SetActive(true);
        _stopButton.gameObject.SetActive(false);
        _arScanningManager.enabled = false;

        // Clear the camera texture queue
        while (_cameraTexturesQueue.Count > 0)
        {
            Destroy(_cameraTexturesQueue.Dequeue());
        }
    }

    private void OnARCameraFrameReceived(ARCameraFrameEventArgs args)
    {
        if (!(_isScanning && _arScanningManager.EnableRaycastVisualization))
        {
            return;
        }

#if UNITY_EDITOR
        if (args.textures.Count == 0)
        {
            Debug.LogWarning("Camera frame received with no textures.");
            return;
        }
        var sourceTexture = args.textures[0];
        Texture2D newTexture = new Texture2D(sourceTexture.width, sourceTexture.height, sourceTexture.format,
                                             sourceTexture.mipmapCount > 1);
        Graphics.CopyTexture(sourceTexture, 0, 0, newTexture, 0, 0);
#else
        if (!_arCameraManager.TryAcquireLatestCpuImage(out XRCpuImage image))
        {
            return;
        }

        TextureFormat format = TextureFormat.RGBA32;
        var newTexture = new Texture2D(image.width, image.height, format, false);
        var conversionParams = new XRCpuImage.ConversionParams(image, format, XRCpuImage.Transformation.None);

        var rawTextureData = newTexture.GetRawTextureData<byte>();
        try
        {
            unsafe
            {
                image.Convert(conversionParams, new System.IntPtr(rawTextureData.GetUnsafePtr()),
                              rawTextureData.Length);
                newTexture.Apply();
            }
        }
        finally
        {
            image.Dispose();
        }
#endif
        // Prevent the queue from growing indefinitely
        while (_cameraTexturesQueue.Count > Delay + 1)
        {
            DestroyImmediate(_cameraTexturesQueue.Dequeue());
        }

        _cameraTexturesQueue.Enqueue(newTexture);
    }

    private void OnRenderImage(RenderTexture src, RenderTexture dest)
    {
        if (_isScanning && _arScanningManager.EnableRaycastVisualization)
        {
            if (_cameraTexturesQueue.Count <= Delay)
            {
                Graphics.Blit(src, dest);
                return;
            }

            var currentTexture = _cameraTexturesQueue.Dequeue();

            // Set the material properties for the shader
            _raycastVisualizationMaterial.SetTexture("MainTex", currentTexture);
            _raycastVisualizationMaterial.SetTexture("_ColorTex", _arScanningManager.GetRaycastColorTexture());
            _raycastVisualizationMaterial.SetInt("_ScreenOrientation", (int)XRDisplayContext.GetScreenOrientation());
            _raycastVisualizationMaterial.SetTexture("_ArCameraTex", currentTexture);

            // Render with the visualization material
            Graphics.Blit(src, dest, _raycastVisualizationMaterial);

            Destroy(currentTexture);
        }
        else
        {
            Graphics.Blit(src, dest);
        }
    }

    private void OnDestroy()
    {
        if (_arCameraManager != null)
        {
            _arCameraManager.frameReceived -= OnARCameraFrameReceived;
        }

        while (_cameraTexturesQueue != null && _cameraTexturesQueue.Count > 0)
        {
            Destroy(_cameraTexturesQueue.Dequeue());
        }
    }
}
Complete the Setup
Now, assign the serialized fields to the ScanVisualization script component in the Inspector:
- Drag the ScanningStripesMaterial material from the Project window to the Raycast Visualization Material field.
- Drag the Start Button from the Canvas to the Start Button field.
- Drag the Stop Button from the Canvas to the Stop Button field.
Try It Out
Run the scene on your device or in the Unity Editor with Playback enabled. Tap the Start button to begin scanning. You should see diagonal stripes overlay the camera feed. As you scan different areas of the scene, those areas will transition from striped to full color, indicating successful scan coverage.
Tap the Stop button to end scanning and the visualization will disappear.
Try playing with the depth range in AR Scanning Manager to see how the visualization is affected.
The visualization uses a small delay (2 frames) to synchronize with the camera image. This ensures the raycast data aligns properly with what the camera is seeing.
When using this with actual recording, call SaveScan() on the AR Scanning Manager before disabling it if you want to save the recorded data. See How to Create Datasets for Playback for more information about saving scan recordings.
Troubleshooting
Visualization doesn't appear
- Confirm the project's render pipeline. This sample only works with Built-in Render Pipeline.
OnRenderImageis not invoked in URP projects. - Ensure that Enable Raycast Visualization is checked in the AR Scanning Manager component.
- Verify that the
ScanVisualizationscript is attached to the Main Camera GameObject and that all serialized fields are assigned. - Check that the ScanningStripesMaterial uses the Unlit/LightshipScanningStripes shader.
Additionally, verify that depth is working:
- Ensure that depth data is available. If lidar is not available, verify that Record Estimated Depth is enabled. If using lidar, ensure that an AR Occlusion Manager is added to the Main Camera.
- Check that Depth is enabled in Niantic SDK Settings under XR Plug-in Management.
Performance issues
- The visualization requires processing each camera frame that's recorded. On lower-end devices, you may experience some performance impact during scanning.
- Consider reducing the Recording Framerate setting in AR Scanning Manager to reduce the compute load.
- Running other AR features such as meshing or device mapping in parallel can lead to CPU pressure. Consider reducing frame rate and fidelity settings in AR Mesh Manager when running in parallel with scanning.
- Setting a shallower depth range results in less compute.