How to Scan and Display a Textured Mesh of an Area or Object
The Niantic Spatial SDK offers a textured meshing feature that can produce a mesh and texture from a recorded sequence. While live meshing is useful for capturing real-time information about the surroundings for the application to respond to, the textured meshing feature lets you save a mesh for offline use and display it with accurate color texturing. Unlike live meshing, textured meshes are generated as a post-processing step after a recording is completed. Photogrammetric textured meshing is supported on all Niantic Spatial SDK-compatible iPhone and Android devices, but scanning with lidar will produce the best mesh quality.
For this demo, we will record an area, process it into a textured mesh, and display it in AR.
Prerequisites
You will need a Unity project with the Niantic Spatial SDK installed and a basic AR scene to get started. For more information, see Set up the Niantic SDK for Unity and Set up a basic AR scene.
Additionally, you will need to install the Niantic Spatial SDK Scan Reconstruction UPM. Install this package via Unity Package Manager using the same method as the main Niantic Spatial SDK package in the setup guide. Scan Reconstruction is not currently supported on Windows.
Using Playback sequences with Scan Reconstruction
Turning an existing Playback sequence into a textured mesh is possible with a slight change in project setup.
AR Scanning Manager can produce two versions of a scan recording:
- Raw Scan format: By default, AR Scanning Manager will write frames directly to disk.
- This is the format that Scan Reconstruction accepts.
- The files are saved to the directory at
ScanStore.SavedScan.ScanPath. Metadata is stored in .pb files.
- Playback format: Optionally, the recorded frames can be exported to a compressed .tgz archive.
- This is the format that Playback and VPS accept.
- The sequence is archived under
ScanStore.SavedScan.ScanPathin a .tgz. Metadata is stored in a capture.json file.
If you have a Playback recording (a .tgz archive, or an extracted sequence that contains a capture.json) that you wish to use with Scan Reconstruction, the sequence must be converted back into Raw Scan format.
The easiest way to do this is to complete this how-to walkthrough in Playback mode instead of using live frame data, with your Playback sequence set as the Playback Dataset Path in XR Plug-in Management → NSDK settings → Playback. The AR Scanning Manager will read the Playback sequence and record it back into a Raw Scan recording in the process of running the below scene.
Adding AR Scanning Manager and AR Occlusion Manager to a Unity Project
To produce a textured mesh, you first need to record a dataset. The AR Scanning Manager component will take a recording and produce a new dataset as a SavedScan object that you will use in the next step. SavedScan points to camera and depth frames saved to disk in Raw Scan format, and this is what Scan Reconstruction processes into a textured mesh.
- Create an empty GameObject in the root of your scene. Name it Scanning.
- Add an AR Scanning Manager component to the Scanning object.
- Enable Use Estimated Depth. (If your device has a lidar sensor, this option can be left unchecked.)
- Enable Full Resolution.
- Set Recording Framerate to 15 FPS.
- Set Near Depth to 0.02 m and Far Depth to 5.0 m (refer to the below note for suggested ranges for small or medium objects).
- Disable the manager component so that it does not start recording when the scene starts.
Achieving Scaniverse-level Reconstruction Quality
The first element in producing a reconstruction with Scaniverse-level quality is to use AR Scanning Manager with the recommended settings. The settings used in this document are important for achieving good quality.
- Keep Recording Framerate at 15 FPS.
- Always enable Full Resolution.
- In the reconstruction script, set mesh and texture qualities to
VeryHighto perform reconstruction with Scaniverse quality. - An appropriately-constrained depth range focuses processing power and detail where it is most needed.
The following is a guide for selecting near & far depth ranges according to the scan area:
- Small object: 0.02 m - 0.8 m
- Medium object: 0.02 m - 2.5 m
- Large object or area: 0.02 m - 5 m
The second element is to follow best practices while taking the scan recording.
- Move the camera slowly and smoothly, and capture surfaces from multiple angles.
- If scanning an object, take time to capture the object from all sides.
- Set up scan visualization in the recording scene to make it easier to keep track of what has been captured.
- Watch this video for advice on how to capture a quality scan.
The third element is depth source. Lidar depth with Area Mode will generally produce the best mesh results. When lidar is not available, Detail Mode is recommended.
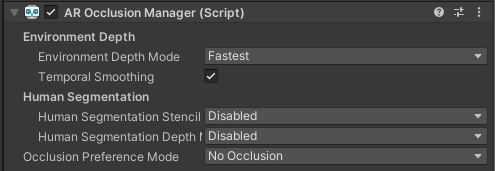
Then, add an AR Occlusion Manager component to generate depth buffers.
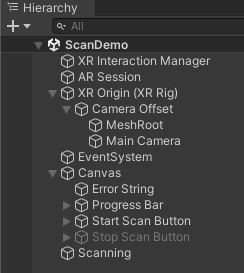
- In the hierarchy, navigate to XR Origin → Camera Offset → Main Camera.
- Add an AR Occlusion Manager component to the Main Camera object.
- Set Occlusion Preference Mode to No Occlusion.
- Add a Nsdk Occlusion Extension component to Main Camera and set its Target Frame Rate to 15 FPS to prevent multidepth from capping the recording FPS to its default rate of 10 FPS.
Handle Scanning with a Script
Next, create a script to handle scanning and reconstruction tasks.
- Add a new script Component to the Scanning GameObject. Name it ScanDemo.cs.
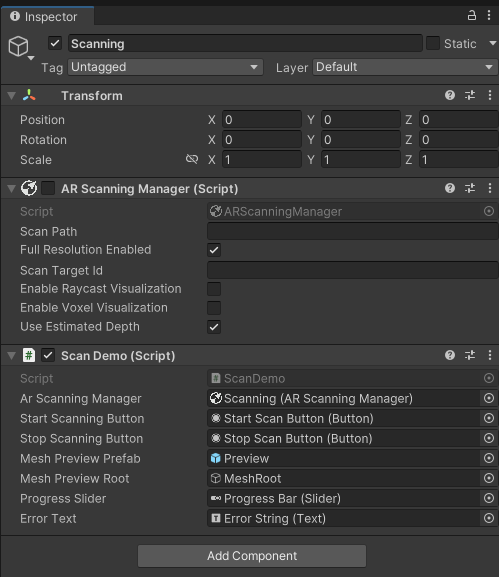
- Add code to accept references to the AR Scanning Manager and buttons to start and stop the scanning. The script will also hold a reference to the
ScanStore, a library of our recorded datasets.
[SerializeField]
private ARScanningManager _arScanningManager;

[SerializeField]
private Button _startScanningButton;

[SerializeField]
private Button _stopScanningButton;

private GameObject _renderedObject;
private ScanStore _scanStore;
private ScanStore.SavedScan _savedScan;

private void Start()
{
    _scanStore = _arScanningManager.GetScanStore();
    _startScanningButton.onClick.AddListener(StartScanning);
    _stopScanningButton.onClick.AddListener(StopScanning);
}

public void StartScanning()
{
    _stopScanningButton.gameObject.SetActive(true);
    _startScanningButton.gameObject.SetActive(false);
    _arScanningManager.enabled = true;
    _renderedObject?.SetActive(false);
}
Create a TexturedMeshProcessor
ScanDemo will use a TexturedMeshProcessor to reconstruct the sequence that it just scanned.
- In ScanDemo.cs, add references to a prefab, a parent GameObject, a slider to show progress, and a text box to display error status.
[SerializeField]
private GameObject _meshPreviewPrefab;

[SerializeField]
private GameObject _meshPreviewRoot;

[SerializeField]
private Slider _progressSlider;

[SerializeField]
private Text _errorText;
- Add a function to stop scanning, save the scan to disk, and start the mesh reconstruction process with the scan.
public async void StopScanning()
{
    _stopScanningButton.gameObject.SetActive(false);
    await _arScanningManager.SaveScan();
    _arScanningManager.enabled = false;
    string scanID = _arScanningManager.GetCurrentScanId();
    _savedScan = _scanStore.GetSavedScans().First(s => s.ScanId == scanID);
    StartReconstruction(_savedScan);
}
To process a specific recorded sequence instead of the first one, search the list returned by GetSavedScans for the desired ScanId.
- After recording a
SavedScandataset, pass it to a TexturedMeshProcessor to start the textured meshing process and wait for it to complete. Optionally export the 3D reconstruction to an OBJ or PLY file.
private async void StartReconstruction(ScanStore.SavedScan savedScan)
{
    ReconstructionMode mode = ReconstructionMode.Detail;
    Quality meshQuality = Quality.VeryHigh;
    Quality textureQuality = Quality.VeryHigh;
    TexturedMeshProcessor reconstructor = new TexturedMeshProcessor(savedScan);
    try
    {
        TexturedMesh result = await reconstructor.Reconstruct(mode, meshQuality, textureQuality,
            (resp) => { _progressSlider.value = resp.Progress; }, default
                //, Format.OBJ          // Uncomment this line if you wish to export to a file.
                //, "/path/to/export/"  // Uncomment this line to provide a custom export path
                );
If your mobile device supports lidar and you plan to capture large areas, you can use Area mode instead of Detail mode. This will result in better quality than meshing a large area with only RGB camera data. Ensure that Prefer LiDAR if Available is enabled in Niantic SDK Settings under XR Plug-in Management. See Supporting lidar and non-lidar use cases for more details.
- Add code to receive the result. Apply the mesh and texture to a prefab for display in the AR view. Delete the recording data from disk to save space, or don't delete yet if you intend to export to a file. If there was a failure, display the error. Finally, reenable the start button to create another scan.
        if (_renderedObject != null)
        {
            Destroy(_renderedObject.GetComponent<MeshFilter>().sharedMesh);
            Destroy(_renderedObject.GetComponent<Renderer>().material.mainTexture);
            Destroy(_renderedObject);
        }

        _renderedObject = Instantiate(_meshPreviewPrefab, _meshPreviewRoot.transform);
        _renderedObject.transform.localPosition = result.Position;
        _renderedObject.GetComponent<MeshFilter>().sharedMesh = result.Mesh;
        _renderedObject.GetComponent<Renderer>().material.mainTexture = result.Texture;
        _errorText.text = "";
        // _scanStore.DeleteScan(_savedScan);  // Uncomment this line to delete the raw data
    }
    catch (Exception e)
    {
        _errorText.text = e.Message;
    }

    _startScanningButton.gameObject.SetActive(true);
}
Create a Mesh Preview Prefab
Next, you will create a prefab with the components necessary to render a generic mesh. The Niantic Spatial SDK already returns Unity-native types for the mesh, texture, and position, so the only thing you need to do is display it with Unity's built-in Mesh Filter and Mesh Renderer tools.
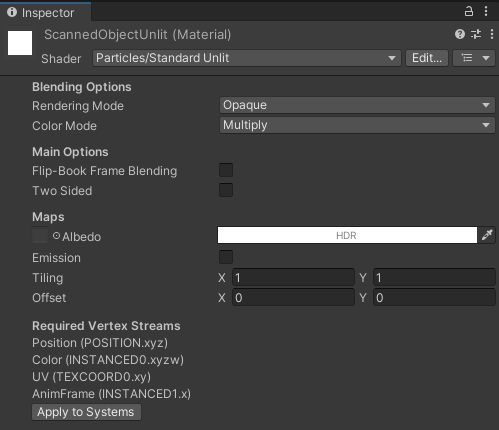
- In your project's Assets folder, create a new material (Right-click → Create → Material). Name it ScannedObjectUnlit.
- Change its shader to Particles/Standard Unlit.
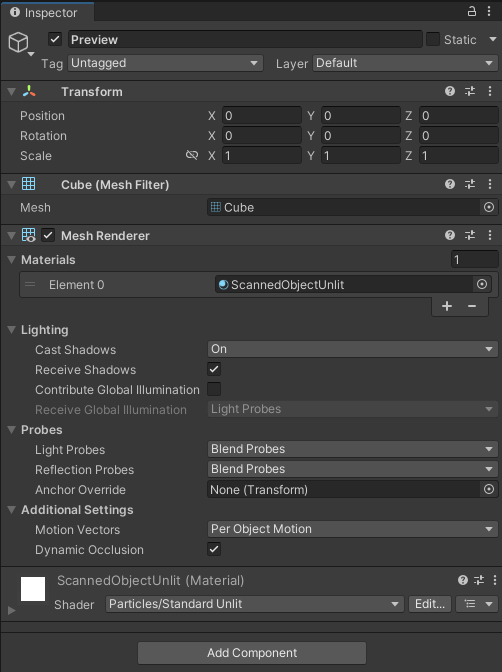
- Anywhere under the canvas, create a Cube (Right-click → 3D Object → Cube). Optionally remove its Box Collider component if you don't want physics collisions.
- Under the cube's Mesh Renderer, set the material to the ScannedObjectUnlit material that you just created. Save the Cube as a prefab in your project's Assets named Preview. This is the object that will turn the SDK's arrays of vertices, triangles and texture coordinates into rendered graphics.
- Delete the Cube from step 3 from the hierarchy—we only needed it to create the prefab.
Complete the UI
To finish off the scene, add several UI objects to your scene.
- Find your Canvas GameObject under the root object in the Inspector, or create one if it does not exist (Right-click → UI → Canvas).
- Under the canvas, add a Legacy Text named Error String (Right-click → UI → Legacy → Text).
- Add a Slider named Progress Bar (Right-click → UI → Slider)
- Add two Legacy Buttons named Start Scan Button and Stop Scan Button, respectively (Right-click → UI → Legacy → Button).
- Update the buttons' text labels to match their names.
- In the inspector, disable Stop Scan Button so that it's hidden until scanning starts.
- In the scene editor, position the buttons and sliders so that they are visible in the scene.
Add an empty GameObject under Camera Offset. Name it MeshRoot and ensure that it has default (identity) transform values. The mesh prefab will be created as a child of this object.
Tie it all together by assigning the serialized fields in the Scanning object with the UI elements and prefab objects that you created.
Export to a File
Textured meshes can export to OBJ and PLY formats. OBJ exports are archived with texture (JPG) and material (MTL) files.
To export the 3D reconstruction to a file, add the desired format and output path to the Reconstruct call.
For example, to export to an OBJ, await reconstructor.Reconstruct(mode, meshQuality, textureQuality, (resp) => { _progressSlider.value = resp.Progress; }, default, Format.OBJ, "/your/path/").
If exportFormat is provided without an exportPath, the file is saved to the scan recording directory. See this document for the default scan recording paths. For example, running this in the Unity Editor on a Mac will save the file under /Users/{Username}/Library/Application Support/{Company Name}/{Project Name}/scankit/{Scan ID}/ by default. Setting the Scan Path field of the AR Scanning Manager component will override the default scan recording location.
Try It Out
Run the scene and tap the start button to start recording. Use smooth camera motion to capture the area and walk around to capture from all angles.
When you're done scanning, it's time for the textured mesh to process. Tap the stop button and watch the progress meter fill. Finally, you should see the textured mesh appear in the camera view as an AR overlay of the area you scanned.
The mesh position is only valid for the current session. If tracking restarts with a different origin, the real-world position of the mesh will be wrong. To consistently place objects across AR sessions and devices, consider using VPS or Device Mapping.
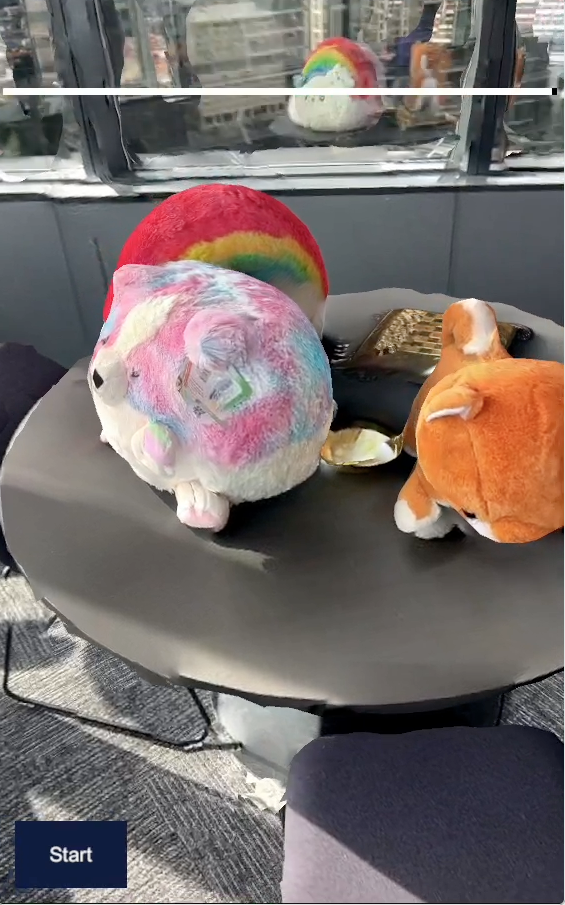
The higher the mesh quality, the longer the mesh will take to process.
Click to reveal the full demo script
using System;
using System.Linq;
using NianticSpatial.NSDK.AR.Scanning;
using NianticSpatial.NSDK.Scanning;
using NianticSpatial.NSDK.ScanReconstruction;
using UnityEngine;
using UnityEngine.UI;

public class ScanDemo : MonoBehaviour
{
    [SerializeField]
    private ARScanningManager _arScanningManager;

    [SerializeField]
    private Button _startScanningButton;

    [SerializeField]
    private Button _stopScanningButton;

    [SerializeField]
    private GameObject _meshPreviewPrefab;

    [SerializeField]
    private GameObject _meshPreviewRoot;

    [SerializeField]
    private Slider _progressSlider;

    [SerializeField]
    private Text _errorText;

    private GameObject _renderedObject;
    private ScanStore _scanStore;
    private ScanStore.SavedScan _savedScan;

    private void Start()
    {
        _scanStore = _arScanningManager.GetScanStore();
        _startScanningButton.onClick.AddListener(StartScanning);
        _stopScanningButton.onClick.AddListener(StopScanning);
    }

    public void StartScanning()
    {
        _stopScanningButton.gameObject.SetActive(true);
        _startScanningButton.gameObject.SetActive(false);
        _arScanningManager.enabled = true;
        _renderedObject?.SetActive(false);
    }

    public async void StopScanning()
    {
        _stopScanningButton.gameObject.SetActive(false);
        await _arScanningManager.SaveScan();
        _arScanningManager.enabled = false;
        string scanID = _arScanningManager.GetCurrentScanId();
        _savedScan = _scanStore.GetSavedScans().First(s => s.ScanId == scanID);
        StartReconstruction(_savedScan);
    }

    private async void StartReconstruction(ScanStore.SavedScan savedScan)
    {
        ReconstructionMode mode = ReconstructionMode.Detail;
        Quality meshQuality = Quality.VeryHigh;
        Quality textureQuality = Quality.VeryHigh;
        TexturedMeshProcessor reconstructor = new TexturedMeshProcessor(savedScan);
        try
        {
            TexturedMesh result = await reconstructor.Reconstruct(mode, meshQuality, textureQuality,
                (resp) => { _progressSlider.value = resp.Progress; }, default
                //, Format.OBJ          // Uncomment this line if you wish to export to a file.
                //, "/path/to/export/"  // Uncomment this line to provide a custom export path
                );
            if (_renderedObject != null)
            {
                Destroy(_renderedObject.GetComponent<MeshFilter>().sharedMesh);
                Destroy(_renderedObject.GetComponent<Renderer>().material.mainTexture);
                Destroy(_renderedObject);
            }

            _renderedObject = Instantiate(_meshPreviewPrefab, _meshPreviewRoot.transform);
            _renderedObject.transform.localPosition = result.Position;
            _renderedObject.GetComponent<MeshFilter>().sharedMesh = result.Mesh;
            _renderedObject.GetComponent<Renderer>().material.mainTexture = result.Texture;
            _errorText.text = "";
            // _scanStore.DeleteScan(_savedScan);  // Uncomment this line to delete the raw data
        }
        catch (Exception e)
        {
            _errorText.text = e.Message;
        }

        _startScanningButton.gameObject.SetActive(true);
    }
}
Troubleshooting
Supporting lidar and non-lidar use cases:
Using lidar depth data will result in higher mesh quality, but not all devices have lidar support. Because of this, depending on your deployment scheme, it may be necessary to configure your scene to run on any device.
If the device has a lidar sensor:
- Ensure that Prefer LiDAR if Available is enabled in Niantic SDK Settings under XR Plug-in Management.
- In
StartReconstruction, assignReconstructionMode mode = ReconstructionMode.Area;if you will scan large areas; otherwise, useReconstructionMode.Detail. - In the AR Scanning Manager component, disable Record Estimated Depth.
If the device does not have lidar, or to configure the scene to run on any device without using lidar:
- In Niantic SDK Settings under XR Plug-in Management, ensure that Prefer LiDAR if Available is disabled and Depth is enabled.
- In
StartReconstruction, assignReconstructionMode mode = ReconstructionMode.Detail;. - In the AR Scanning Manager component, enable Record Estimated Depth.
- Ensure that an AR Occlusion Manager is present on the Main Camera.
The scene crashes when I run it:
There may be a lidar configuration mismatch between your device and scene. See Supporting lidar and non-lidar use cases to match the scene configuration to your target device.
Ensure that Scanning is enabled in Niantic SDK Settings under XR Plug-in Management.
The scan produces a low-poly or inaccurate mesh:
If possible, perform the scan with a lidar device and configure the scene for lidar capture (see above). Scan with as much light on the subject as possible. Use smooth and slow camera motions when scanning. Take time to capture the subject from all angles.
The mesh fails to export to a file
Textured meshes can fail to export if the scan recording directory name has changed.
SavedScan directories are stored by their ID and created with 12-character alphanumeric names.
Renaming the directory before running reconstruction can cause the export task to fail.
To resolve this issue, avoid renaming the directory.
Processing fails with "Not enough points for triangulation"
This error can occur when a scan is either too short (not enough frames covering the captured area from multiple angles) or too long (the frames that are selected for processing do not have enough overlap with each other).
If this happens during a short scan, take enough time to slowly capture the surfaces from multiple angles.
If this happens during a long scan, consider focusing on a smaller area for each scan to allow for more frames per surface.
Processing fails with "PoseRefiner failed"
This error can occur when a scan is too short or too sparse.
To resolve this issue, take time to slowly capture the area from multiple angles, and use the recommended settings from this walkthrough.