Authorization
Introduction
There are three common reasons to use token-based authorization with NSDK:
- Learning: Use the sample login reference to understand how the NSDK sample apps handle login, token exchange, and token usage on the client.
- Development and internal testing: Use a developer token issued from the Scaniverse web and include it directly in your application build or server code. Developer tokens have a developer-defined lifespan of up to 90 days and can be revoked at any time. No backend server is required.
- Production deployment: Use short-lived access tokens issued by your backend for authenticated users. You integrate your own identity system with a secure backend for token management, and create one or more service accounts through the Scaniverse web.
The NSDK sample apps described in Client code integration also use intermediate session and refresh tokens as part of a reference login flow. These are implementation details of the sample and not a third authorization approach.
The following table summarizes the main authorization use cases and related reference flow:
| Use case | Token type | Who handles tokens | Prerequisites | Learn more |
|---|---|---|---|---|
| Development and internal testing | Developer tokens | You create and manage the token | Scaniverse organization, portal access to create tokens | Generate developer tokens |
| Production deployment | Short-lived access tokens | Your backend server issues tokens per user | Scaniverse organization, service account, backend server | Generate access tokens |
| Sample login flow reference | NSDK access token exchanged through Niantic's sample backend | The sample app and sample backend handle the login and token exchange flow | NSDK sample app, Scaniverse account | Sample login reference |
Start with a developer token to get up and running quickly. Move to production application authorization when you are ready to distribute your app to end users or need per-user access control.
Development and internal testing
A developer token is a signed, organization-scoped token you can issue from the Scaniverse web and embed in your application build or a server-side script. Every NSDK API call made with the token inherits the access of the organization that issued it, so no login screen, callback handling, or token refresh logic is required.
Developer tokens are a good fit when:
- You are shipping an NSDK build to internal testers, demos, or pilot customers without adding a login flow.
- You want to call VPS or Scaniverse Portal REST APIs from a server-side script or continuous integration job.
- You want to prototype quickly before implementing a production authorization flow.
How to create a developer token
- Sign in to Scaniverse web.
- Select Credentials > Developer Tokens from the left navigation pane.
- Select New developer token.
- Enter a unique name under Developer token name.
- Select an Expiration date for when the token will automatically expire. Choose values as short as 7 days and as long as 90 days.
- Select the checkbox next to Scaniverse API if your application needs to use sites that you created and manage in Scaniverse, including site discovery paths in NSDK.
- Select the checkbox next to VPS API to give the developer token permission to use NSDK features that rely on VPS/VPS2 services, such as localization, VPS-based positioning, or VPS/VPS2 experiences tied to mapped locations.
- Select Create.
- Copy the raw token into your application configuration or secrets store. Scaniverse only shows the developer token once.
Your application must send the developer token in every API call to Niantic Spatial API using the Authorization: Bearer header.
For the full workflow, see Generate developer tokens.
Developer token limits
Developer tokens can be created and managed directly in Scaniverse web. The following table shows their lifetime, scope, rate, and revocation limits:
| Lifetime | Up to 90 days |
| Scopes | VPS API, Scaniverse API, or both. Use VPS API for VPS and VPS2 localization features. Use Scaniverse API for sites you created and manage in Scaniverse, including site discovery in NSDK. |
| Rate limit | 10 requests per second per token |
| Per organization | Up to 25 active tokens at a time |
| Revocation | Any organization member can revoke a token, and revocation propagates globally within about 5 minutes |
When to move to production authorization
Consider moving to production application authorization when:
- You are distributing your app outside of a trusted group, such as a public app store release.
- Different users need different levels of access to assets or services.
- You need per-user audit, expiration, or revocation.
- Users who download your distributed app may be able to extract and misuse an embedded long-lived token.
Production applications
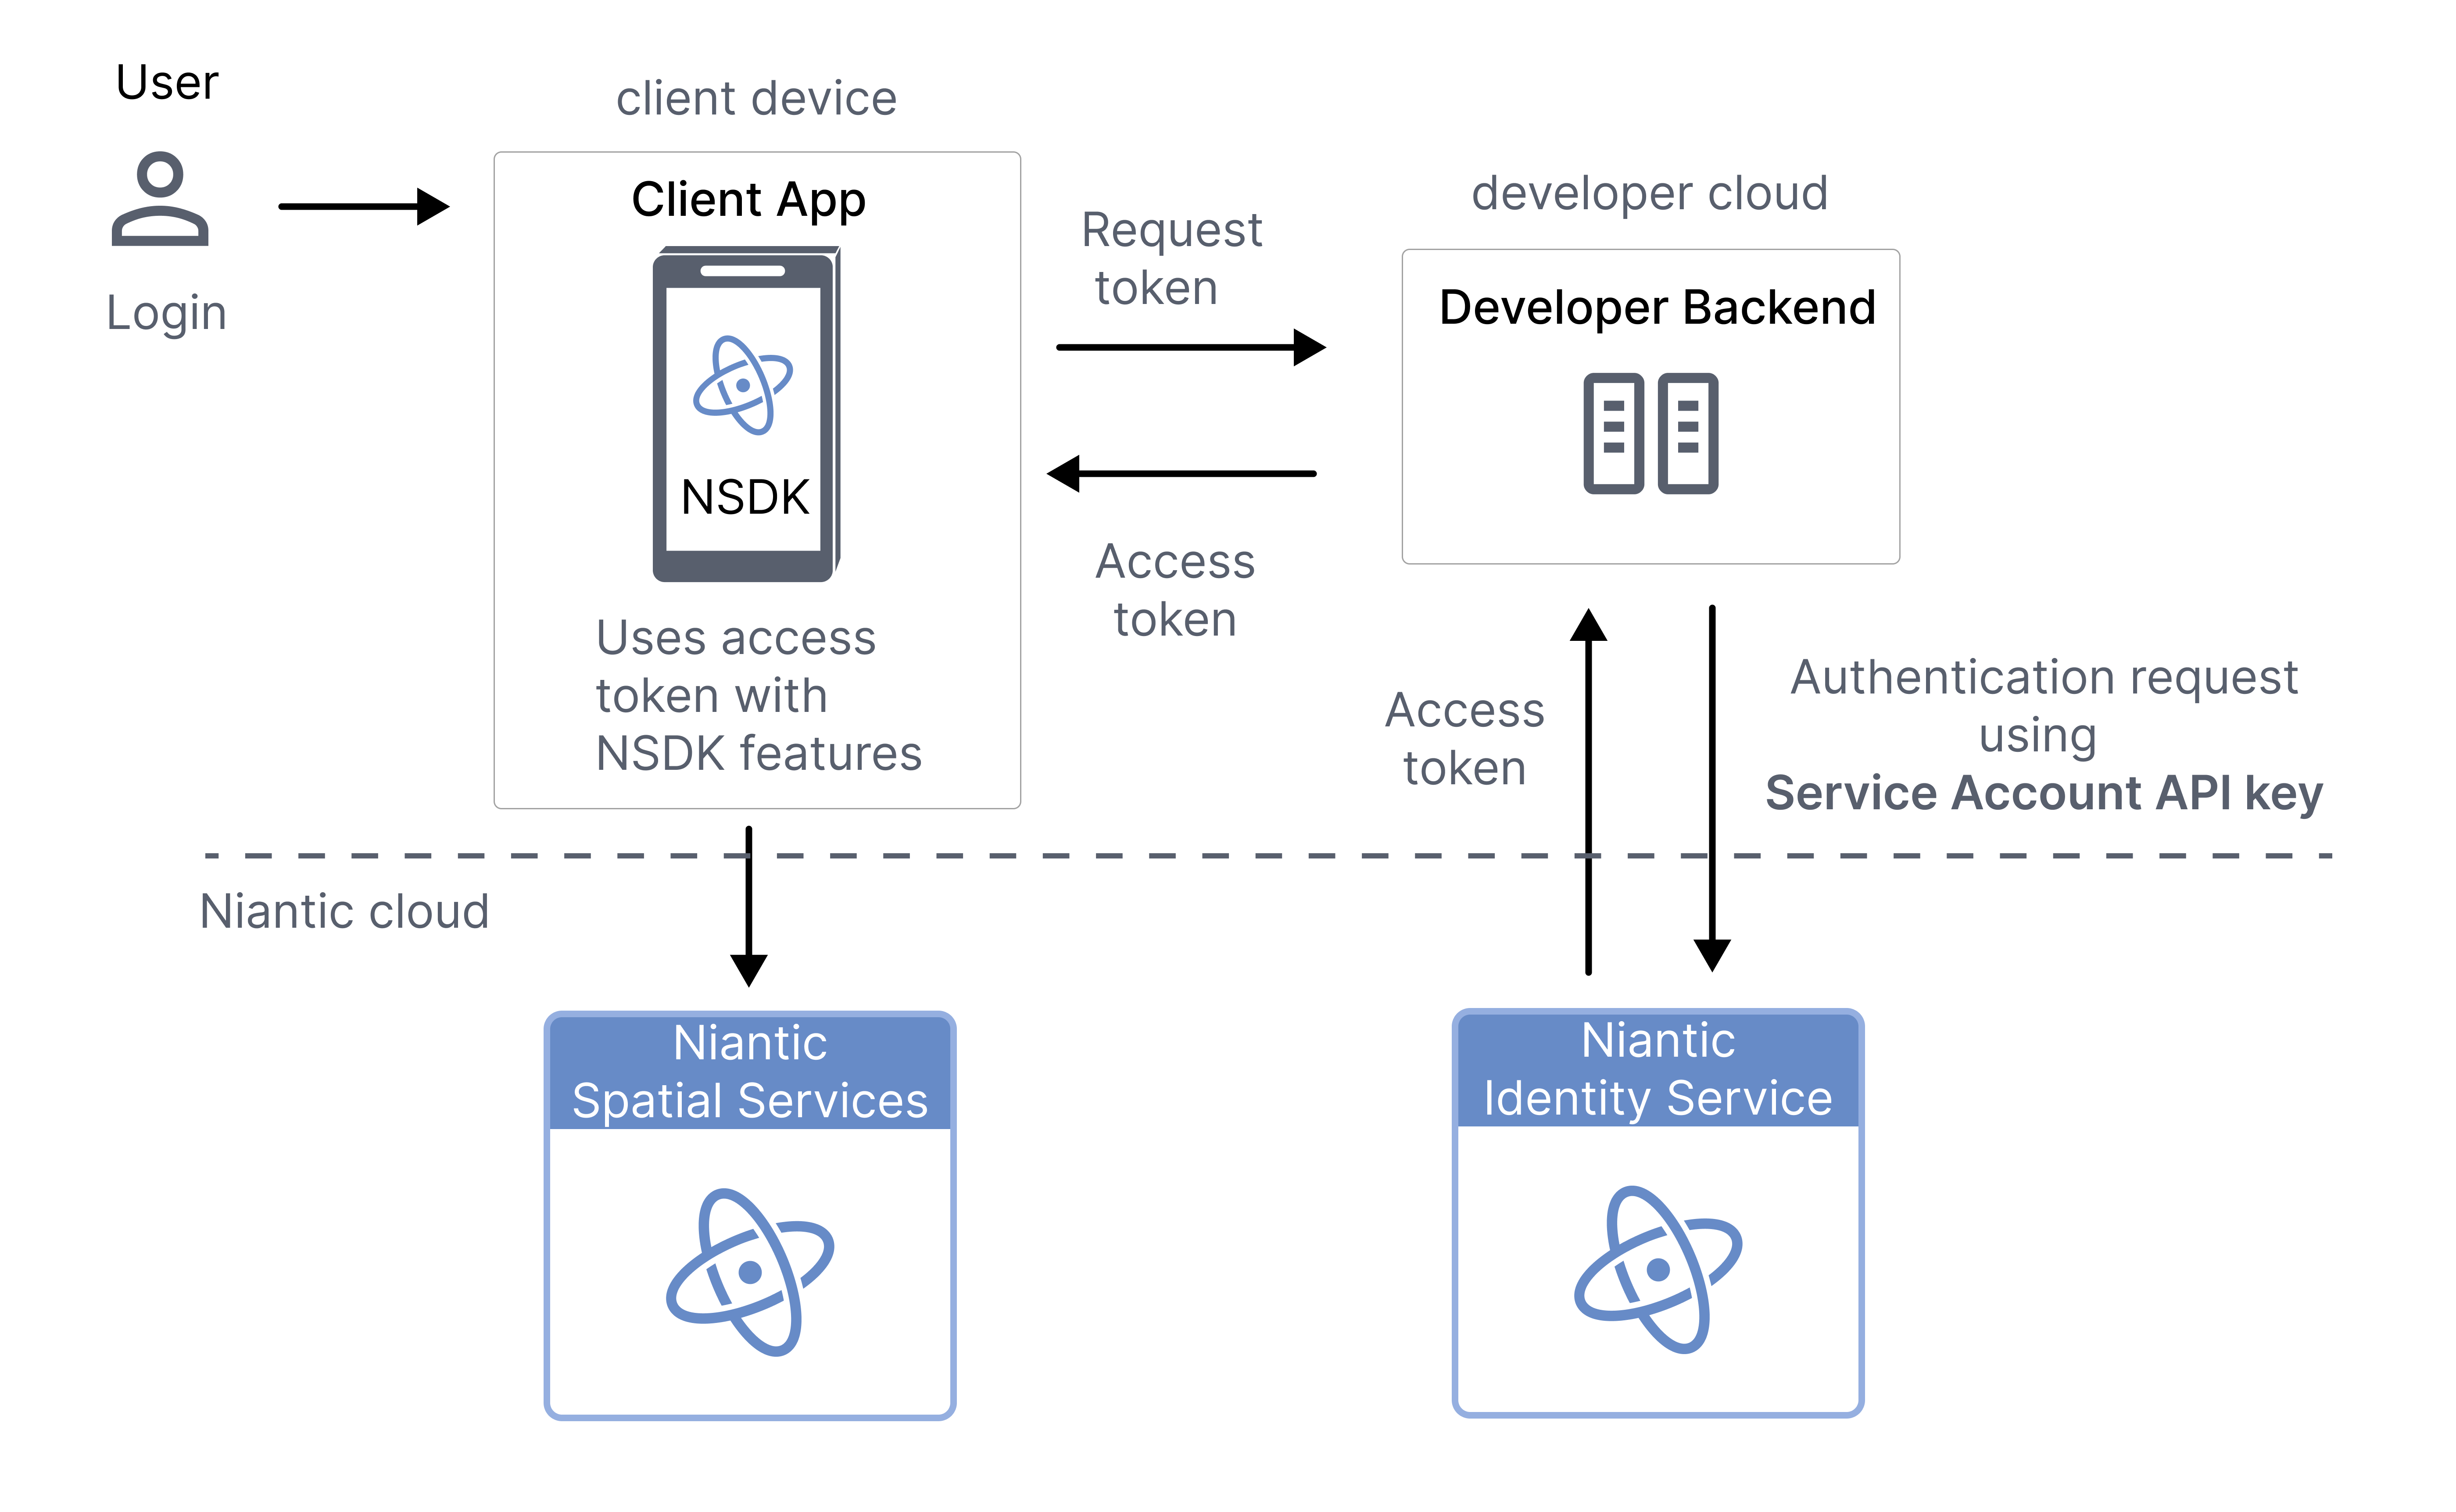
For production apps, implement a secure backend token flow to manage NSDK access. Your backend uses a service account API key to request short-lived access tokens from the Niantic Spatial Identity Service and delivers them to the client. This enables per-user authorization with scoped permissions, so different users of your app can have different levels of access to assets and services.
Production application authorization is the recommended approach for any app distributed beyond a trusted group, because access tokens embedded in client binaries can be extracted and misused.
How it works
To set up an application for handling production authorization, integrate the service account flow across your client and backend. Then, you can use custom authentication and Niantic Spatial service accounts to provide user-scoped, short-lived access to Niantic Spatial services:
| Step | Actor | Action |
|---|---|---|
| 1 | User | Logs in to your app using your user management system. |
| 2 | Client app | Requests an access token from your backend. |
| 3 | Developer backend | Uses a service account to request a short-lived access token from the Niantic Spatial Identity Service. |
| 4 | Developer backend | Returns the access token to the client app. |
| 5 | Client app | Uses the access token with NSDK features to access Niantic Spatial services. |
The following diagram demonstrates the auth flow for setting up production authorization:
Benefits
- Per-user access control: Each user authenticates through your system, and your backend can issue tokens with different scopes and permissions.
- Short-lived tokens: Access tokens expire in an hour and must be refreshed through your backend, limiting the impact of a compromised token.
- No embedded secrets: API keys and long-lived credentials stay on your server and are never distributed to clients.
- Scalable multi-user support: Your backend handles token lifecycle for all users of your app.
Passing access tokens to the NSDK
Both developer tokens and production-issued access tokens are accepted by the same NSDK API. Choose the token type that matches your use case.
Set the access token through the NSDK settings:
using NianticSpatial.NSDK.AR.Loader;

NsdkSettingsHelper.ActiveSettings.AccessToken = "YOUR_ACCESS_TOKEN";
Replace YOUR_ACCESS_TOKEN with the token from Scaniverse web or from your production backend. For complete project setup instructions, see Set up the Niantic SDK for Unity, Set up the NSDK in Swift, or Set up the NSDK in Kotlin.
Next steps
- Generate developer tokens — How to issue a token from Scaniverse web for development and prototyping.
- Generate access tokens — How to create service accounts, request tokens, and manage token lifecycle from your backend.
- Client code integration — How to set, validate, and refresh access tokens in Swift, Kotlin, and Unity apps.