First localization with NSDK
Localization determines a device’s position and orientation in the real world. VPS2 localization provides precise alignment when the device is within a scanned Site that has a Production Asset Version. Outside those areas, localization may be limited or unavailable.
This guide walks through the complete workflow—from installing the Scaniverse app to testing localization at your first scanned location using the NSDK Kotlin or Swift sample apps. You will build Niantic’s NsdkSamples application and use the Sites scene to verify localization on your device.
By the end of this guide, you will:
- Capture a location.
- Generate an Asset Version and set it to Production.
- Deploy the sample app.
- Successfully localize at that physical location.
This guide covers the following steps:
- Capture a scan - Install and use the Scaniverse mobile app to record visual features as you move through a space.
- Upload and process scans - Upload and process scans to convert them into 3D spatial representations of a place, such as meshes or splats.
- Configure assets - Set generated assets to production and test localization.
- Build and run - Install, configure, build and deploy Niantic's sample application on your desktop and run it on a mobile device.
Prerequisites
Before you begin, ensure that you have the following:
- A desktop computer to build and run a mobile app.
- A working Git installation.
- A Scaniverse business or enterprise account. If you don't have an account, follow the steps in Create Account to sign up for one.
- A USB cable to connect your desktop to your mobile device.
- Unity Hub and Unity Engine installed.
- A mobile device compatible with the NSDK
- An Android device running Android 7.0 or later with USB debugging enabled.
- An iOS device that supports ARKit.
Capture a scan
The Scaniverse mobile app uses your device camera to capture live images as you move through a space. Niantic backend services process these scans using the NSDK to create spatial assets for localization. Assets must be set to Production before they are available for localization in the sample app or your own applications. After installing the app, you must sign in with a Niantic business or enterprise account.
Install the Scaniverse app
- Install the latest Scaniverse app from the Apple App Store on your mobile device.
- Open the Scaniverse app on your mobile device.
- Select the profile icon, shown as a person, in the top right corner of the app.
- If you're already logged into Scaniverse as a consumer, sign out.
- At the bottom of the login screen, tap Sign in with Business Account and sign in using your Niantic business or enterprise account.
If you are in multiple organizations, you can select your organization by going to Profile → select Organization dropdown.
Create a private Site
When you create a Site as a business or enterprise customer, the Sites you create are private by default. This means that only you or your organization can access it. You can use a private Site for testing, internal tools, or unreleased locations. You can create a Site either from the Scaniverse app as follows:
- Select the + button on the top right corner of the app. The Add private site window opens.
- Under Site Name, enter a clear, descriptive, and unique name.
- Select Confirm.
Add scans to your Site
A scan is a collection of camera images that capture visual features as you move through a space. Each individual scan supports up to five minutes of recording time and can cover up to 500 square meters. For larger environments, capture multiple overlapping Scans within the same Site.
Niantic's backend services use these scans to build a three-dimensional representation of the space. You can use this representation to localize a device by aligning it to the physical environment. You can group multiple scans together in a Site, but they must overlap so that Niantic can connect some of the same visual features into a single, consistent representation. In the following steps, you will create a Site and record scans.
For more reliable localization:
- Capture distinct visual features such as walls, furniture, and decorations.
- Move slowly and steadily to reduce motion blur.
- Include multiple angles and viewpoints.
- Cover the full area that you want to localize to.
For more detailed guidance, see Scan techniques.
Use a mobile device camera to capture scans as follows:
-
Start a scan
- On your mobile device, select the Site you created in the previous step.
- Select + Capture at the bottom of the screen.
- Select the red button at the bottom of the screen to begin scanning the space.
-
Move and capture
- Point your device camera at the area you want to scan.
- Move slowly and steadily to reduce motion blur.
-
Finish and review
- Select the red button again to stop scanning. A preview of the scan begins to play.
- Select Localize at the bottom of the app to quickly check the quality of your scan. The app will use the camera to compare live images against the visual features in the scan to see if it can recognize the location and determine the device position and orientation. If localization fails, you can immediately rescan the environment instead of uploading the scan and discovering problems later.
- Select the pen tool next to the default name to change the name of the scan to a clear, descriptive name.
- Select the trash icon at the bottom left of the screen to discard, or Save to keep your scan.
Upload and process scans
After you capture scans, you upload them so Niantic's backend services can generate spatial assets used for localization and reconstruction. These assets represent the scanned space and can include the following:
- Mesh - a 3D surface model for accurate geometry, occlusion and interaction.
- Splat - a lightweight 3D representation for efficient visualization and localization.
- VPS Map - a nonvisual map that enables localization at a scanned location.
To generate assets, upload your scans and process them. To use them in an app, configure the assets by setting them to production. After generation, you can test localization to confirm that the scan was processed successfully.
Upload scans
During upload, your scans are transferred to Niantic’s cloud and prepared for processing. You can upload all scans at once or select them individually. Uploading selectively is useful when working with large scans, testing quality, or reducing processing time and cost.
The Scaniverse app lists all scans for your Site under the Scans tab.
Select the scan from the previous step to upload it individually, or select Upload All to upload all scans in the Site. After upload, your scans are also available to your team in the Scaniverse Web.
Process scans
During processing, Niantic's backend services analyze the uploaded scans, extract visual features, and generate spatial assets used to recognize and align a device in the environment. This step generates the assets required for localization and reconstruction. Depending on the size of the scan, this step can take several minutes to over an hour.
Start processing in the Scaniverse app as follows:
- Navigate to the Scans tab for your Site.
- Select the checkbox next to the uploaded scans that you want to process.
- Select Generate Assets at the top right corner of the main window.
- (Optional) Enter a meaningful name under Version name to help track changes in the scan.
- Select Confirm.
Processing typically can take several minutes to over an hour depending on scan complexity. Once processing is complete, newly generated assets will be available in either the Scaniverse Web or the Scaniverse app under Assets -> History.
Configure assets
After your scans finish processing, Niantic's backend services add the generated assets to your Site. By default, these assets are in a preview state and are not available to live applications.
To make them accessible to users and applications, you must set the asset to production.
Once the asset is in production, it becomes available to authenticated applications in your organization.
Set the assets to production state in the Scaniverse app as follows:
- Navigate to the Assets tab for your Site.
- Select the three horizontal dots next to the name of your scan at the bottom of your screen.
- Select Set as Production from the drop-down list.
Once localization works in Scaniverse, you’re ready to verify it in the NSDK sample app.
Test localization
Asset generation only creates the underlying spatial data. It does not guarantee that localization will work reliably in a real space. Before using the assets in an app, test localization to confirm the following:
- Devices can reliably localize in the scanned physical space.
- Tracking remains stable and content stays accurately aligned.
- Performance is acceptable across supported devices.
- Changes in lighting, occlusion, or the environment don't prevent successful localization.
Testing localization to ensure your device can match live camera input to your generated asset, and validate the user experience as follows:
- Go to the physical place you scanned.
- In the Scaniverse app, select the Site that you want to test.
- Select the Assets tab.
- Select Localize.
- If prompted, select Allow to give Scaniverse permission to access your device camera.
The app attempts to match your current camera view to the generated assets. If localization is successful, the asset will appear correctly aligned in your environment.
If localization fails, see the following:
Details
Rescan the space using guidelines in the Capture a scan section. Once you've completed rescanning the environment, do the following:
- Go back to the Upload and process scans step.
- Unselect the scan(s) you are replacing, and select the new scan(s).
- Generate assets again.
The new asset appears in the Assets tab after processing. Previous versions remain available under the History tab. Scroll to view different versions of your assets. To test localization, select the three horizontal dots next to its name and select Test localization. When you decide which version to use in your app, select the three horizontal dots next to its name and select Set as Production.
Build and run
After generating assets, configure and deploy the Niantic sample app to verify localization against your production asset. To do this, set up the sample app, then build and deploy the sample app from your desktop as follows:
Set up the sample app
In Niantic's sample app, you will run the Sites example, which shows how to localize a device and place AR content in a real world environment. The Sites scene retrieves your organization’s Sites and production assets and localizes dynamically without hardcoding anchor payloads.
Do the following:
- Clone the Unity Samples repository:
git clone https://github.com/nianticspatial/nsdk-samples-csharp - Open the Nsdk-Samples project in Unity 6000.0.58f2:
- Launch Unity hub.
- Select Add → Add project from disk.
- Navigate to and select the cloned nsdk-samples folder.
Build and deploy
- Open the Build Profiles window by selecting File > Build Profiles.
- Select iOS or Android, then click Switch Platform. After the progress bar finishes, click Player Settings. Select your platform from the tabs, scroll down to Other Settings, and change the following settings:
- Android
- iOS
- Rendering - Uncheck Auto Graphics API. If Vulkan appears in the Graphics API list, remove it.
- Identification - Set the Minimum API Level to Android 7.0 'Nougat' (API Level 24) or higher.
- Configuration - Set the Scripting Backend to IL2CPP, then enable both ARMv7 and ARM64.
- Identification > Signing Team ID - Enter your iOS app developer key from developer.apple.com.
- Camera Use Description - Write a description for how you're using AR, such as "NSDK".
- Target Minimum iOS Version - Set to 14.0 or higher.
- Architecture - Select ARM64.
Localize in sample app
After building the NsdkSamples app on your desktop and deploying it to your mobile device, you can run any of Niantic’s sample modules to explore different features.
This guide focuses on the Sites sample, which demonstrates how to:
- Browse organizations and Sites associated with your account.
- Select a Site that has a Production Asset Version available.
- Test localization directly at that physical location.
When you select a production asset, the app prepares the Site for localization on your device.
Localization works best in locations that have already been scanned and processed. For best results, return to the same physical space where the scan was captured.
Before browsing Sites and assets, you must sign in. The sample app uses authenticated sessions to access your organization’s data from Niantic’s backend services. For more information, see the Auth guide.
Launch the sample app and authenticate as follows:
- Ensure you are located at the physical location you scanned.
- Open the NsdkSamples app on your device.
- Sign in using the same account you used to upload and process scans.
- Select VPS2 Localization from the main menu.
- Choose your organization.
- Select Start Tracking.
- Point your device camera at the scanned area.
- Move slowly to help the system match visual features
- Ensure good lighting matches the scan conditions
- Use the following Transformer Tracking State indicators to adjust how you attempt to localize:
- Red = not localized
- Yellow = limited localization
- Green = precise localization (success)
View detailed tracking state behavior:
Details
Anchor Tracking State (bottom center)
Each tracked anchor displays visual feedback based on its AnchorUpdateType:
-
NOT_TRACKING:- Info label: "No anchors tracked".
- Markers disabled and hidden.
- No visual indicator.
-
LIMITED:- Info label: "coarse".
- A Large Cube marker appears at the anchor location.
- The mesh marker is disabled and hidden.
- The device has an approximate location with lower precision.
- A red arrow appears in front of the camera pointing toward the place of interest.
-
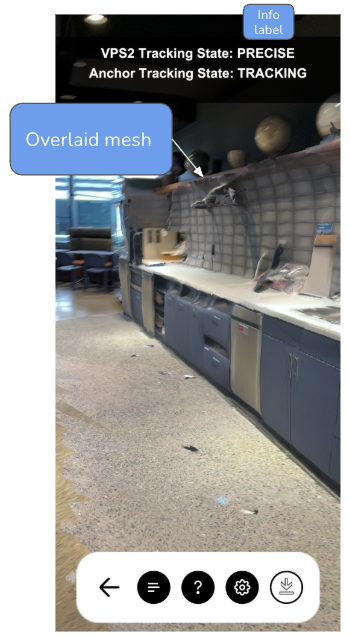
TRACKING:- Info label: "precise"
- A Mesh marker with textures overlays the location.
- The cube marker is disabled and hidden.
- The device has a precise location with high accuracy.
- The mesh represents the actual scanned environment geometry.